Experienced the issue that VRChat is not loading? You aren’t the only one out there with this problem. This article outlines the top 5 ways to fix your VRChat not loading issues to avoid losing any gameplay downtime.
Update your graphics card driver to the latest version
Your VRChat not loading problems might not have anything to do with VRChat. Instead, it could have everything to do with another internal software issue. Your graphics card is the primary tool for game-paly and anything relying on rendered images. So, if your graphics card is out of date, corrupted, otherwise not correctly communicating with your operating system, undoubtedly, you will have program issues.
For those that need a quick primer, computer drivers are the code packages that translate the language of the hardware into something that your operating system understands. Because operating systems get updated semi-often, drivers need updating as well.
Here are the steps:
- Figure out which graphics card you have, the specs, and the brand.
- Next, go to the graphics card manufacturer’s website and navigate to the drivers’ download page.
- There you can navigate to your specific driver based on your card’s specs and your operating system.
- Download the software and run the installation program.
- Make sure to restart your computer to ensure that the update takes effect.
- Alternatively, there are plenty of driver auto-updaters on the market for PC drivers that will do all of the work for you.
If you think this process is a bit troublesome …
You can use a driver updater. This is a more convenient option — it only takes a few mouse clicks to update a driver!
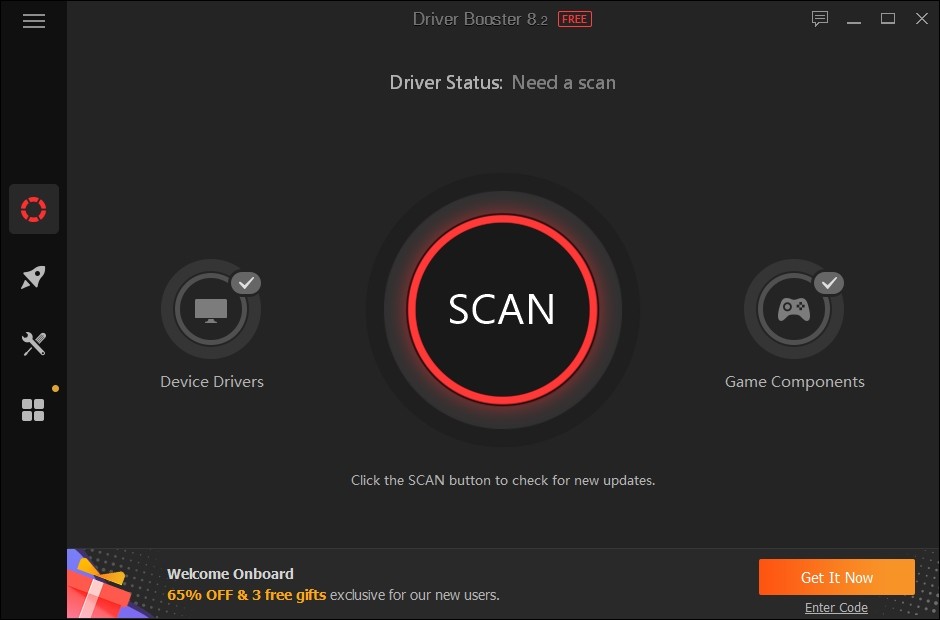
The driver updater we recommend is Driver Booster, because it’s powerful and easy to use, and you can use it to update drivers for free!
And what’s more, it provides a 60-day money back guarantee. So you can give it a try without taking any risks.
To use Driver Booster to update your graphics driver:
Step 1: Download Driver Booster and install it on your computer.
Step 2: Launch Driver Booster, and scan for driver updates.
Clear out the VRChat temporary files
Your VRChat not loading problems could be due to the build-up of temporary files slowing down the program’s launching to the point of failure. Usually, VRChat has a minimal temporary file footprint. However, this is only valid for newbies or those that don’t interact with others.
Every individual you meet while playing VRChat that has a custom avatar uses your temporary files. Your computer stores these custom avatar forms in your computer’s temporary files to make the gameplay faster. So, if you have been playing for a significant number of hours or haven’t restarted your computer in a while, the temporary file size may be the culprit to your VRChat not loading issues. However, don’t worry. This is an easy fix.
Here are the steps:
- The quick fix is to restart your computer. This may flush those unnecessary temporary files. However, barring this as a solution, you will need to delete them, as described next manually.
- Navigate to your computer’s temporary files folder for VRChat. The path is usually “%Username%\AppData\Local\Temp\VRChat”. If you can’t find it, enter it into the dialogue box’s search box. This folder should come up quickly.
- Delete all the temporary files present and restart your computer. It should run smoothly.
Check your antivirus settings
Your VRChat not loading issues may be caused by your antivirus flagging the VRChat network connect as suspect and blocking the connection. Typically, antivirus software is meant to protect your computer from actual threats. However, it is pretty standard for these types of software to confuse certain unknown network connections and cut off an otherwise innocuous program.
Regardless of whether this is the actual problem, altering the settings on your antivirus to ignore VRChat is a good form for protecting the network connection in the future. Luckily the setting fix is quick and straightforward. So you can feel like an antivirus pro from this little tutorial.
Here are the steps:
- Note that these steps apply to “Windows Security” and other third party antivirus systems you may have installed and are currently using.
- For “Windows Security,” open Windows Settings and navigate to the Virus & Threat Protection.
- For other antivirus systems, you will want to open their settings directory.
- Either in “Windows Security” or your alternative antivirus program, there should be an exceptions or exclusions “add or delete” button, tab, or area. Navigate to this.
- Finally, add an exception for “VRChat.”
- This could mean identifying the program, or it could mean, as it is for “Windows Security,” adding an exclusion that is the VRChat installation folder.
Turn off or disable IPV6 while running VRChat
Your VRChat loading problem could be associated with the specific network settings for your computer, i.e., IPV4 versus IPV6. Here is a quick primer on network communications. When you are online, your browser is speaking from your computer, a fixed point, another end server, and a fixed point. Each fixed point has a unique address. This helps find websites and game servers.
The address is identified by the Internet Protocol Version (TCP/IP). The TCP IP version that used to dominate the web was TCP/IPv4. IPv6 is slowly supplementing iPv4. The number refers to the number of decimals in the address. For example, six is more than four, allowing for more digital addresses.
Your VRChat not loading may signify that the IP version your computer is using is screwing up the address and not connecting. All you need to do is force the computer to use IPv4 for an assured network connection.
Here are the steps:
- First, you need to run a small bit of software. Press “Windows + R.” This will open the run dialogue box. Type in “ncpa.cpl.” Hit Enter or Run.
- This program will take you to your computer’s Network Connections Control Panel.
- Right-click your current connection.
- There should be a Networking tab. Navigate to this.
- Scroll down until you see a checked box labeled: “Internet Protocol Version 6 (TCP/IPv6).
- Uncheck the box for TCP/IPv6. This will disable IPv6.
- To accomplish this fix, you may need to run as an Administrator.
- Further, you could get to the Network Connections Control Panel via the network icon, left-clicking on your connection, and selecting the Properties option on the dropdown menu.
The last longshot method to fix your VRChat not loading issues is to delete your VRChat settings completely. However, if you are having trouble loading VRChat, it may be nearly impossible to alter the settings. Luckily, there is a quick fix. First, though, back up your computer in case you blow it up by accident.
Here are the steps:
- Open up the Run dialogue box as described before, but instead of running the prior program, you will want to run “regedit,” hit okay or run, and make sure the “Registry Editor” file opens.
- Navigate to your VRChat preferred settings and delete them in their entirety. You can locate them by scrolling through endless folders or just entering the path “Computer\HKEY_CURRENT_USER\Software\VRChat\vrchat” into the navbar.
- Once you’ve identified the correct folder, delete the contents and restart your computer.
Bottom Line
Note that you should only consider these options after shutting the program down and restarting it or restarting your computer. If all else fails, you can always uninstall and reinstall the software. Before deleting or altering anything on your computer, make sure to back up your system entirely. Don’t let a quick delete modify your other systems.