
Having problems with your Internet connection? This is a very common issue for Windows users. Some of them can’t access certain websites, while others have no Internet connection at all.
Although it’s common, there are still a lot of effective ways to solve this problem. The following are some troubleshooting tips you can try to fix your Internet connection issues on your computer.
Tip 1: Restart your devices
This is the most simple and effective way to fix your Internet connection issues — just try restarting your devices. These include your computer and your modem/router. In many cases, this is enough to restore your Internet connection.
Tip 2: Undo your recent network setting changes
You made any changes to your network settings, such as setting up a proxy connection for your Windows computer? If so, this is probably the cause of your Internet connection problem. Try temporarily undo these changes, and see if this solves your problem.
Tip 3: Use a VPN
If you haven’t used a VPN, then using one is an effective option. This can help you bypass the restrictions on your Internet connection.
The VPN service we recommend is NordVPN. It is an easy-to-use and fast VPN service. And its fast speed servers at multiple locations offer you a comfortable and reliable VPN experience.
Also, NordVPN is one of the few services that has a strict no logs policy. With its military-grade encryption, NordVPN provides you with top-level security and privacy.
NordVPN is very easy to use. All you need to do is just two or three mouse clicks:
- Download and install NordVPN on your computer.
- Run NordVPN and sign in your account.
- Click the Connect switch. This will automatically connect you to the VPN server recommended for your device.
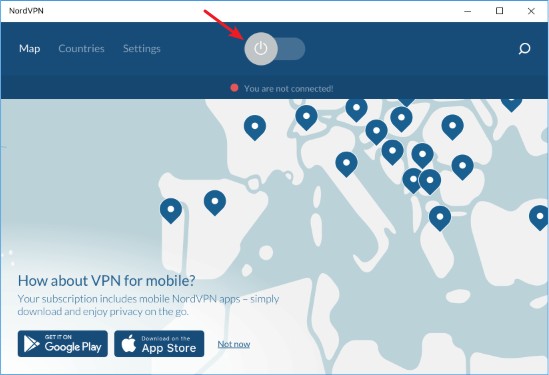
Now enjoy the fast and convenient VPN experience NordVPN brings you!
Tip 4: Check your DNS settings
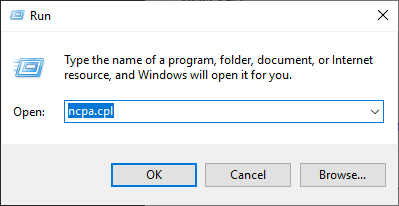
Another effective way to troubleshoot the your Internet connection issues is to check your DNS settings:
- Press Win + R on your keyboard.
- Type “ncpa.cpl” and press Enter on your keyboard.
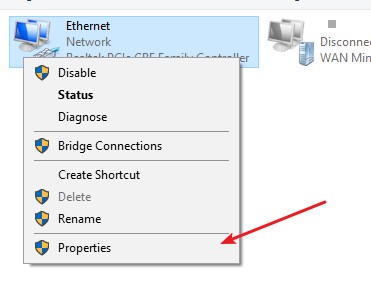
- Right click your network connection (“Ethernet” for wired connection, and “Wi-Fi” for wireless), and select Properties.
- Double click Internet Protocol Version 4(TCP/IPv4).
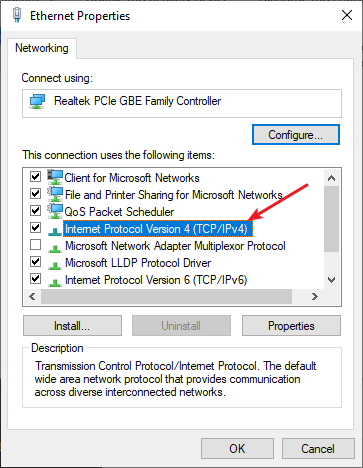
- Make sure Obtain an IP address automatically and Obtain DNS server address automatically are selected, then click OK. (If they already are then skip this step and go to step 7.)
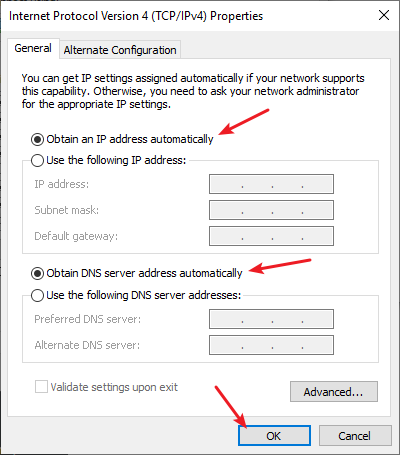
- Check if this fixes your error. If not move on to the step below.
- Select Use the following DNS server addresses, then set the server addresses to the Google public DNS server addresses (8.8.8.8 / 8.8.4.4).
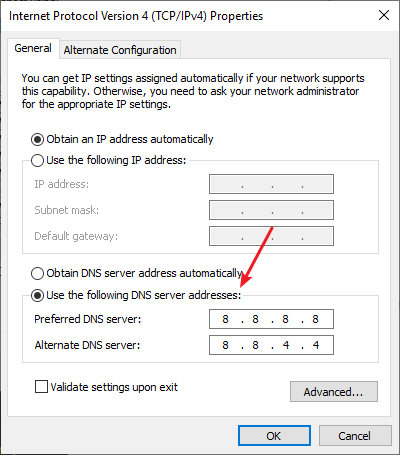
- Click OK and see if this fixes your error.
Tip 5: Reset your network settings
You can also fix your Internet connection problems by resetting your network settings. To do so:
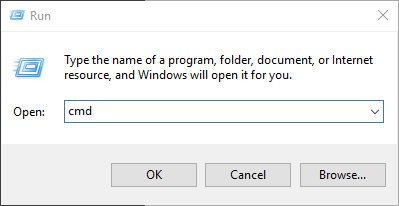
- Press Win + R on your keyboard.
- Type “cmd” and press Ctrl + Shift + Enter on your keyboard.
- Enter the following commands:
ipconfig /flushdns
ipconfig /renew
ipconfig /registerdns
- Close the window and restart your computer.
Has any of the methods above worked for you? Tell us by leaving a comment below!